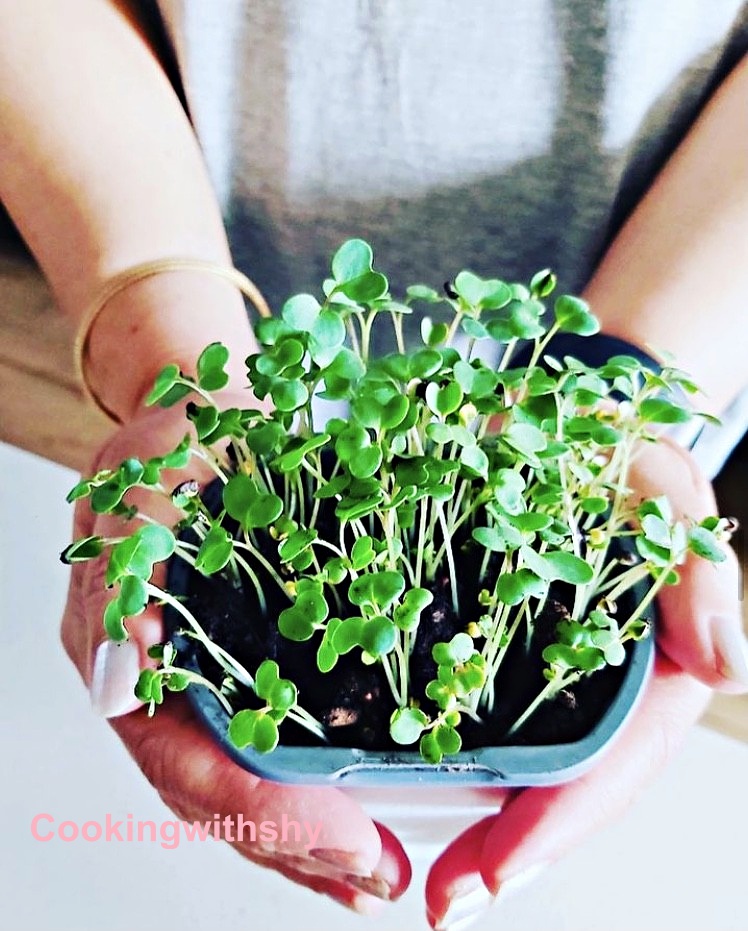
Microgreens are young, edible greens harvested at a seedling stage stage of growth, typically before the onset of the first true leaves. These tiny greens are packed with nutrients and flavor, making them a favorite addition to salads, sandwiches, and garnishes.
I had been contemplating growing microgreens for awhile now, as they often come in handy for plating and garnishes. The best part of growing microgreens is that you may use some of your pantry staples such as mustard, fenugreek, coriander or sunflowers seeds. I like to grow them in some organic potting soil that I use growing my herbs. However you may try growing them hydroponically too.
Here are some handy tips in growing Microgreens:
- Selecting the Seeds: Some popular choices include arugula, mustard, cilantro, kale broccoli and sunflower. Ensure the seeds are of a good quality. You may include kale and radish seeds too.
- Method of Growing: Microgreens can either be grown in soil or can be grown hydroponically.
- Containers: I generally use small herb containers with drainage holes to prevent waterlogging. Along with plastic trays.
- Sowing Seeds: Do ensure you spread out the seeds evenly in the soil. Avoid overcrowding and gently spread some soil over the seeds and press down gently.
- Watering:Water after sowing and ensure the soil is moist at all times. You may use a small misting spray can to water every day.
- Light: The windowsill works great for growing microgreens being a well lit area with plenty of indirect sunlight. Place the trays in a well-lit area, preferably near a window where they can receive indirect sunlight.
- Temperature and Humidity: Microgreens generally thrive in temperatures between 60-75°F (15-24°C). Maintain adequate humidity levels by covering the trays with a clear plastic lid.
- Germination: You will see small shoots sprout up in typically a few days and these will start getting longer.
- Growing Time: Microgreens are ready for harvest in about 1-2 weeks after germination. Ideally harvest these greens when they are 1-3 inches in height. Harvest when the first true leaves appear and the greens are 1-3 inches tall.
- How To Harvest: Gently snip the microgreens with a pair of scissors just above the soil level. Rinse under water and use.
- Storage: Microgreens are best consumed fresh. All though you may store them in an airtight container in the refrigerator for a couple of days.
- Replanting: You may sow in the same container once you have harvested the microgreens after a few days.
Microgreens can be a wonderful and visually appealing garnish to may dishes, adding a burst of flavour and tons of nutrition too. These tiny shoots are a powerhouse of antioxidants, minerals and vitamins.
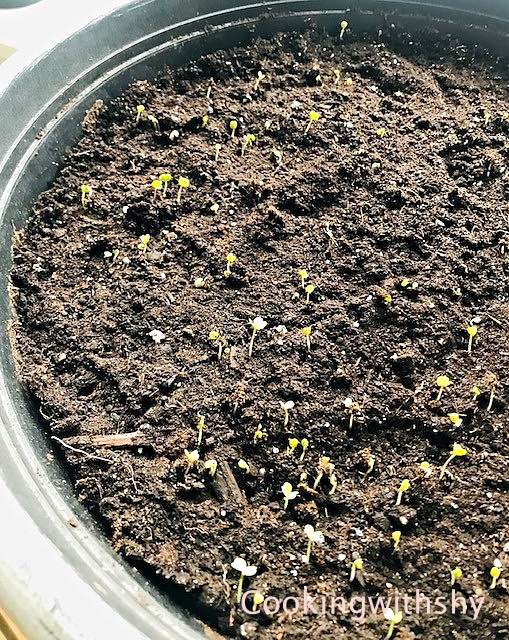
Mustard microgreens at Day 4 of sowing the seeds.
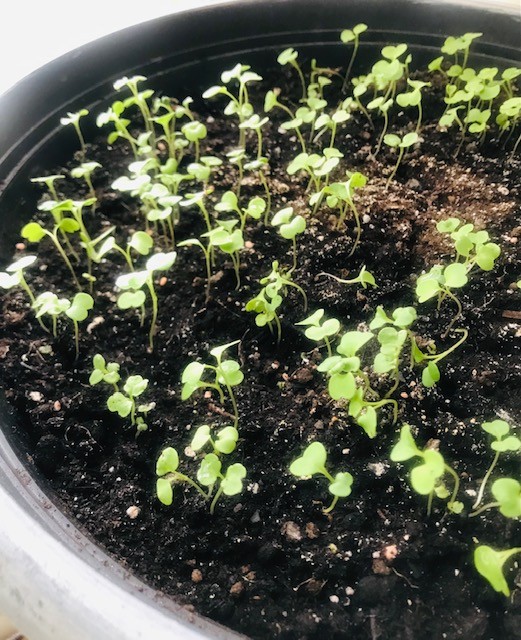
Mustard microgreens at day 11
Use Microgreens In:
- Salads: Sprinkle some microgreens for a burst of colour and texture to your salads and add a delicate crunch too.
- Sandwiches & Wraps: These microgreens sure add a layer of freshness and added crunch to any sandwich or wrap.
- Soup: Garnish your soup with a handful of microgreens and add a vibrant contrast to your soup.
- Egg Dishes: Garnish your omelettes, frittatas and shakshuka with some microgreens and elevate the presentation of your dish.
- Curry: Use some microgreens as a garnish over your favorite curry like a butter chicken or a paneer makhani. They will add a fresh and enticing look to your dish.
I have rounded up a series of some of my favorite meals and used microgreens as a great garnish. The following are various recipes that I taught at a online cooking workshop last week here in Toronto. Do join in as I post details of these classes on this page and on my IG page too.
I do hope you too will explore the vast possibilities of growing and pairing microgreens with your recipes.
1.Green Goodness Shakshuka: ( Eggs poached in sauteed baby spinach)

Ingredients:
- 1 small onion (chopped finely)
- 1 stalk green onion ( stalk and leaves chopped finely)
- Handful of Dill leaves ( finely chopped)
- 1-2 cloves garlic (minced)
- 150 g baby spinach ( washed and chopped roughly)
- 1 teaspoon lemon juice
- 1/4 teaspoon paprika
- 1/2 teaspoon powdered cumin
- 1/2 teaspoon powdered coriander
- 1 tablespoon Olive Oil
- 1 tablespoon Butter
- 2 medium eggs
- Crumbled Feta cheese
- Salt and pepper to taste
- Microgreens ( for garnish)
Directions:
- Sauté the white onions in the butter and Olive oil for a minute.
- Next add in the minced garlic and sauté.
- Mix in the paprika, cumin and coriander powders.
- Now add in the chopped spinach and cook till softened and add in the lemon juice.
- Season with salt and pepper.
- Add in the chopped dill leaves ( You may even add in some chopped Kale if you like)
- Mix all the greens well. Make small indents in the spinach mixture and crack the eggs into these spaces.
- Cover the pan with a lid and let the eggs poach for about 8-12 minutes.
- Sprinkle some crumbled feta cheese and garnish with microgrens.
2. Paneer Curry ( Cottage Cheese Curry) :

Ingredients:
- 250 g Paneer (cubed)
- 3 tablespoons Oil (Vegetable Oil)
- 1 teaspoon Cumin seeds
- 1 Medium Onion (finely chopped)
- 1 Cup Yogurt (whisked)
- 2 tablespoons Gram flour (lightly roasted)
- 2 teaspoons chilli powder
- 1 teaspoon turmeric powder
- 1 teaspoon coriander powder
- 1 teaspoon garam masala
- 1 teaspoon chat masala
- ½ teaspoon crushed pepper
- 1 tablespoon Kasuri methi leaves
- Salt to taste
- Pinch of sugar
- 1 cup water
- Coriander leaves (chopped for garnish)
Directions:
1.Take a pan and heat it. Add a tablespoon of oil to this and lightly fry the cubed paneer and keep this aside.
2. In the same pan lightly roast the gram flour till there is no raw aroma.
3.Now whisk the yogurt and add in the gram flour and chilli powder and keep aside.
4. Next heat another pan and add 2 tablespoons of oil and add in the cumin seeds and let them splutter.
5.Then add in the chopped onions and fry till medium brown in color.
6. Add in the turmeric powder, coriander powder, salt and pepper.
7. Next add in the whisked yogurt and add about a cup of water and stir well.
8.Simmer for 5-8 minutes. Add in the cubed paneer.
9.Lastly add the garam masala, chat masala, kasuri methi and a pinch of sugar.
10.Garnish with chopped coriander leaves.
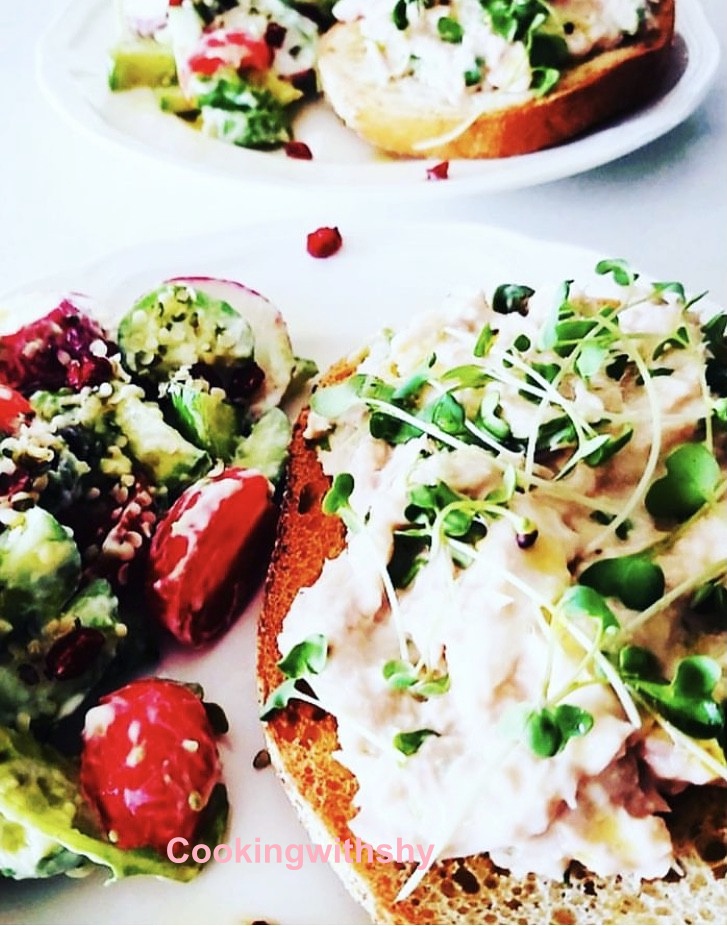
3. Chicken Salad on Sourdough bread :
For The Chicken Salad:
Ingredients:
- 1 cooked chicken breast (shredded)
- 2-3 tablespoons mayonnaise ( or use half mayonnaise and half amount of greek yogurt)
- 1 stalk green onion ( finely chopped)
- 1 -2 green chillies ( finely chopped)
- handfull of Cilantro ( finely chopped)
- 1 small green bell pepper (finely chopped)
- Salt and pepper to taste
Directions:
- Add the shredded chicken to a mixing bowl.
- Next add in the mayo-yogurt and mix well.
- Add in the rest of the ingredients and mix well.
- Season with salt and pepper.
- Spread over a slice of sourdough bread
- Garnish with some microgreens.
4. Diced Watermelon & Feta Cheese Salad:
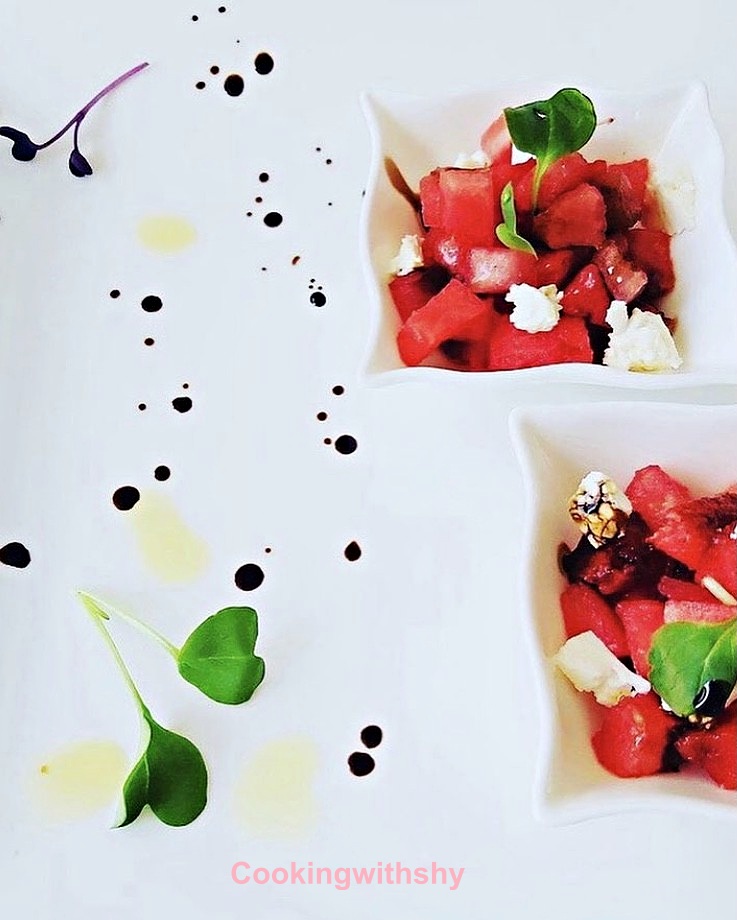
For This Recipe:
Summer fresh flavours and colours in this easy to put together side.
Simple ingredients here call for diced watermelon, crumbled feta cheese and some radish microgreens that add a great crunch and add to the visual appeal as a garnish too. You may choose any garnish of your choice. Microgreens are chock a full nutrients, vitamins and beta carotene compared to the mature plants. You may buy store bought ones that include a variety of microgreens like kale, beet, peas shoots, broccoli or even perhaps sunflower and wheatgrass. This summer salad ticks off all the boxes.
For The Balsamic Reduction:
Heat 1/4th cup of balsamic vinegar on medium heat for about 15-20 minutes till it thickens and coats the back of your spoon. Drizzle over the watermelon and feta and season with salt and pepper.
5. Beetroot & Potato Sliders: ( Beetroot-Potato tikkis)

Ingredients:
- Two medium beetroots (boiled and grated finely)
- One medium Potato (boiled and grated finely)
- 1 pod garlic (minced)
- 2 tablespoons grated white onion
- Salt and pepper to season
- 1/2 teaspoon chilli powder
- 1/2 teaspoon raw mango powder (optional)
- 1-2 tablespoons rice flour or corn flour (to bind)
- 3 tablespoons vegetable oil for frying.
Directions:
- Mix all of the above (except oil) really well and let the mixture rest for half an hour.
- Form small balls and flatten them slightly.
- Heat a frying pan and add the vegetable oil. Shallow fry the cutlets till medium brown.
- Serve hot with any dipping sauce of your choice.
6. Stuffed Portobello Mushrooms:
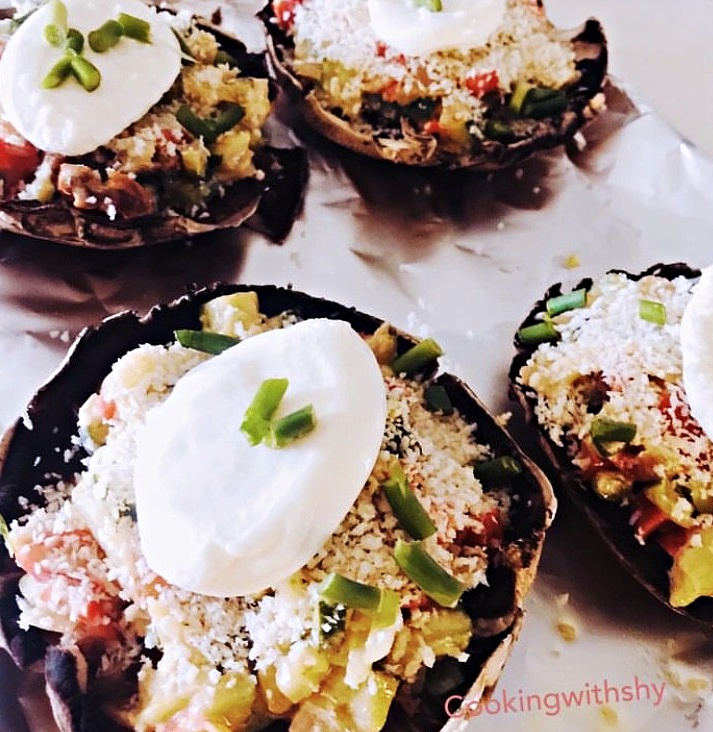
Ingredients:
- 4 Large Portobello Mushrooms
- 2 tablespoons Olive oil ( plus extra for brushing the mushrooms)
- 1 large Onion (chopped finely)
- 2 cloves garlic (minced)
- 2 small zucchini (diced)
- 1 roasted bell pepper(diced)
- 4-6 sundried tomatoes (roughly chopped)
- Salt & pepper to taste
- Fresh mozzarella (sliced for garnish)
- Garlic scapes or microgreens (for garnish)
- Breadcrumbs ( for topping)
Directions:
- Preheat the oven to 375 F and line a baking sheet with parchment paper.
- Using a small spoon scoop out the gills of each mushroom and with a knife remove the stalk.
- Brush each mushroom cap with some olive oil and place on the baking tray, stalk side facing up.
- Heat some olive oil in a saute pan. Add onions and fry till translucent.Next add in the zucchini and cook till it is soft. Nextadd in the bell peppers and tomatoes and cook further for a 2-3 minutes.
- Season with salt and pepper.
- Divide the mixture in four parts and stuff each mushroom cap with this.
- Sprinkle some breadcrumbs on top of the mixture.
- Top it off with a slice of the fresh mozerella.
- Bake for about 20 minutes.
- Garnish with microgreens or sauteed garlic scapes.
Get creative with your use of microgreens as a garnish, and don’t be afraid to try them in different dishes to see what works best for you!
These delicate greens certainly add visual appeal to any dish making it look sophisticated and elevates the presentation of the dish. Despite their tiny size they sure add a burst of flavor and freshness to any dish. Furthermore these young greens when harvested at an early stage are nutrient dense with high amounts of vitamins and antioxidants that provide a nutritional boost to any dish.

very nice, looks great
Thanks very much! Growing microgreens is easy and works great as a garnish!
Micro greens certainly do add visual appeal to any dish as can be seen in your terrific photos. I’m always amazed how much flavor they have for being so tiny.
Thanks Karen..hope you are well.